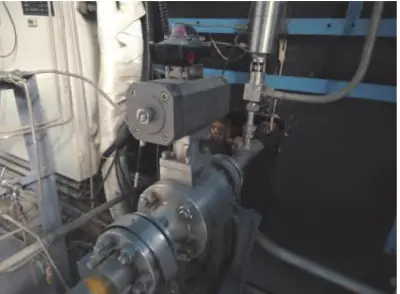
Detecting Cracks of Main Steam Pipe Globe Valves
Nov 03, 2023
In recent years, many accidents have occurred in the steam pipelines of combined thermal and power boilers and enterprise-owned power station boilers, causing great economic losses and social impacts to the country and society. The main steam pipeline valve is an important pressure component to ensure the safe operation of the power station boiler. In accordance with the relevant requirements of the "Notice on Carrying out the Investigation and Rectification of Hidden Pipeline Hazards within the Range of Power Station Boilers", when the main steam is inspected, it was found that serious cracks, shrinkage holes and other defects happen for a globe valve in the main steam pipe of the power station boiler, which posed serious risks. Therefore, analyzing the reasons for valve cracking is very important to ensure the safe operation of the power station boiler.
In September 2019, when investigating hidden dangers in the main steam header of a boiler in a thermal power plant, it was discovered through macro inspection that the flange surface of the globe valve body at the east end of the main steam pipeline cracked, with a length of approximately 190 mm. The entire valve body was further inspected in detail through penetrant testing, hardness tests, metallographic tests and other tests; the causes of valve body cracking were analyzed, and suggestions were made in terms of the casting process, installation process and use process.
1. Inspection and testing processes
TSG 11-2020 "Technical Regulations of Boilers" stipulates that macroscopic inspection of the outer surface of the valve body should be carried out to check whether there are obvious corrosion cracks, leaks and casting defects on the valve. If necessary, conduct non-destructive testing for the surface and spot-check the inner surface of the valve body to see if there are obvious corrosion, erosion, cracks and casting defects; check whether or not the sealing surface is damaged; valve bodies with operating temperatures greater than or equal to 450°C shall be subject to hardness of 50,00HV and metallographic inspection, and the number of spot inspections shall be no less than 1 point each.
1.1 Macroscopic inspection
The valve area is relatively large, so macroscopic inspection should be adopted; non-destructive inspection should be carried out on key parts. During the overall macro inspection of the main steam pipe globe valve, it was found that the flange surface of the east end globe valve body cracked, with a length of about 190mm. Because the gap formed at the end of the crack is relatively sharp, the stress is very concentrated, causing the crack to extend. Macroscopic inspection revealed a shrinkage hole at the edge of the flange hole on the inner side of the valve body flange. As shown in Figure 1, the shrinkage hole is located on both sides of the edge of the flange hole and is about 50mm. Shrinkage holes will reduce the effective bearing area of the valve, and cause discontinuity in the valve structure, stress concentration, thereby reducing the impact resistance, fatigue resistance and compactness of the valve.
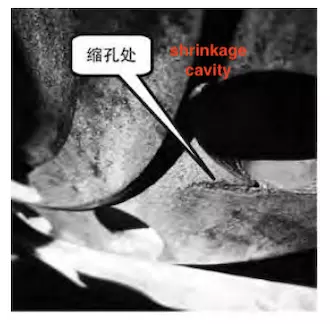
Figure 1 Shrinkage holes at the edge of the flange hole
During a macroscopic inspection of the inner surface of the valve body, it was found that there was much obvious porosity on the inner side of the valve body, as shown in Figure 2. Porosity generally appears in the last solidified part of the valve or the structural mutation part. The shape of the porosity is irregular, rough and accompanied by impurities and small holes.
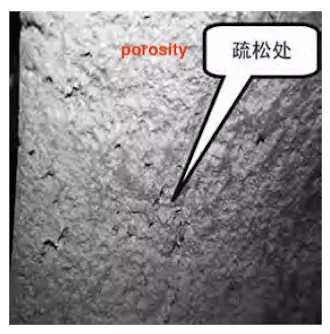
Figure 2 Porosities on the surface of the valve body
1.2 Penetration detection
Penetrant testing is mainly used to detect surface opening defects and is widely used in the inspection of pressure-bearing special equipment. A 100% penetration test was conducted on the inner surface of the flange and the flange surface due to the complex structure of the valve. The results are shown in Figure 3. It was found that the crack was an opening defect with a certain depth and extension at the end.
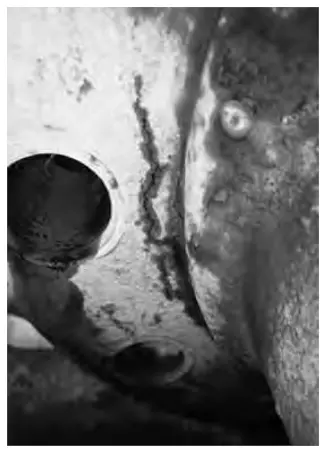
Figure 3 Penetrant inspection of defect locations
1.3 Magnetic particle testing
Magnetic particle testing is mainly used to detect defects with small sizes and extremely narrow gaps on the surface and near-surface of ferromagnetic materials. It can detect micro cracks. Among conventional non-destructive testing methods, magnetic particle testing has the best sensitivity for detecting surface cracks. The valve body was 100% magnetic particle inspected and no relevant indications were found on the surface of the valve body. All outer surfaces and accessible inner surfaces of the valve body and bonnet are inspected for surface defects using magnetic particle testing.
1.4 Metallographic examination
Metal valves used in thermal power plants need to be used under high temperatures for a long time. The valve materials will gradually deteriorate over time. Metallographic inspection is mainly to observe, identify and analyze the internal structure of metals and alloys. The metallographic structure reflects the specific metallographic properties of the metal form. The operating temperature of the main steam pipe globe valve is 450°C, and the cumulative operating time is 11 230 hours. The location of the flange surface defects of the main steam pipe globe valve was metallographically inspected with reference to DL/T 674-1999 "No.20 Steel Pearlite Spheroidization Rating Standard for Thermal Power Plants " and DL/T 786-2001 "Carbon Steel Graphitization Inspection and Rating Standard", there is obvious ferrite and pearlite in the structure, and no carbides are found near the ferrite grain boundaries. There are no carbide particles found in the crystal, so it is rated as level 1. There is no pearlite spheroidization, and its metallographic structure can be seen in Figure 4.
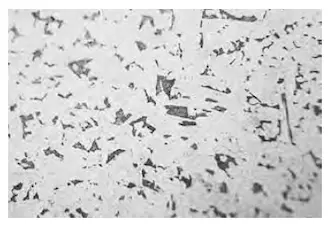
Figure 4 The metallographic structure of the flange surface (with a magnification of 500 times)
1.5 Hardness testing
Hardness testing is an important indicator for testing material performance and is also the fastest testing method. The hardness testing is performed on the flange surface of the main steam pipe globe valve. 5 points are measured at each location and the average value is taken. The hardness value can be seen in Table 1. The average value is 121 HB, and the hardness value is within a reasonable range.
Table 1 Hardness measurement values
In September 2019, when investigating hidden dangers in the main steam header of a boiler in a thermal power plant, it was discovered through macro inspection that the flange surface of the globe valve body at the east end of the main steam pipeline cracked, with a length of approximately 190 mm. The entire valve body was further inspected in detail through penetrant testing, hardness tests, metallographic tests and other tests; the causes of valve body cracking were analyzed, and suggestions were made in terms of the casting process, installation process and use process.
1. Inspection and testing processes
TSG 11-2020 "Technical Regulations of Boilers" stipulates that macroscopic inspection of the outer surface of the valve body should be carried out to check whether there are obvious corrosion cracks, leaks and casting defects on the valve. If necessary, conduct non-destructive testing for the surface and spot-check the inner surface of the valve body to see if there are obvious corrosion, erosion, cracks and casting defects; check whether or not the sealing surface is damaged; valve bodies with operating temperatures greater than or equal to 450°C shall be subject to hardness of 50,00HV and metallographic inspection, and the number of spot inspections shall be no less than 1 point each.
1.1 Macroscopic inspection
The valve area is relatively large, so macroscopic inspection should be adopted; non-destructive inspection should be carried out on key parts. During the overall macro inspection of the main steam pipe globe valve, it was found that the flange surface of the east end globe valve body cracked, with a length of about 190mm. Because the gap formed at the end of the crack is relatively sharp, the stress is very concentrated, causing the crack to extend. Macroscopic inspection revealed a shrinkage hole at the edge of the flange hole on the inner side of the valve body flange. As shown in Figure 1, the shrinkage hole is located on both sides of the edge of the flange hole and is about 50mm. Shrinkage holes will reduce the effective bearing area of the valve, and cause discontinuity in the valve structure, stress concentration, thereby reducing the impact resistance, fatigue resistance and compactness of the valve.

Figure 1 Shrinkage holes at the edge of the flange hole
During a macroscopic inspection of the inner surface of the valve body, it was found that there was much obvious porosity on the inner side of the valve body, as shown in Figure 2. Porosity generally appears in the last solidified part of the valve or the structural mutation part. The shape of the porosity is irregular, rough and accompanied by impurities and small holes.

Figure 2 Porosities on the surface of the valve body
1.2 Penetration detection
Penetrant testing is mainly used to detect surface opening defects and is widely used in the inspection of pressure-bearing special equipment. A 100% penetration test was conducted on the inner surface of the flange and the flange surface due to the complex structure of the valve. The results are shown in Figure 3. It was found that the crack was an opening defect with a certain depth and extension at the end.

Figure 3 Penetrant inspection of defect locations
1.3 Magnetic particle testing
Magnetic particle testing is mainly used to detect defects with small sizes and extremely narrow gaps on the surface and near-surface of ferromagnetic materials. It can detect micro cracks. Among conventional non-destructive testing methods, magnetic particle testing has the best sensitivity for detecting surface cracks. The valve body was 100% magnetic particle inspected and no relevant indications were found on the surface of the valve body. All outer surfaces and accessible inner surfaces of the valve body and bonnet are inspected for surface defects using magnetic particle testing.
1.4 Metallographic examination
Metal valves used in thermal power plants need to be used under high temperatures for a long time. The valve materials will gradually deteriorate over time. Metallographic inspection is mainly to observe, identify and analyze the internal structure of metals and alloys. The metallographic structure reflects the specific metallographic properties of the metal form. The operating temperature of the main steam pipe globe valve is 450°C, and the cumulative operating time is 11 230 hours. The location of the flange surface defects of the main steam pipe globe valve was metallographically inspected with reference to DL/T 674-1999 "No.20 Steel Pearlite Spheroidization Rating Standard for Thermal Power Plants " and DL/T 786-2001 "Carbon Steel Graphitization Inspection and Rating Standard", there is obvious ferrite and pearlite in the structure, and no carbides are found near the ferrite grain boundaries. There are no carbide particles found in the crystal, so it is rated as level 1. There is no pearlite spheroidization, and its metallographic structure can be seen in Figure 4.

Figure 4 The metallographic structure of the flange surface (with a magnification of 500 times)
1.5 Hardness testing
Hardness testing is an important indicator for testing material performance and is also the fastest testing method. The hardness testing is performed on the flange surface of the main steam pipe globe valve. 5 points are measured at each location and the average value is taken. The hardness value can be seen in Table 1. The average value is 121 HB, and the hardness value is within a reasonable range.
Table 1 Hardness measurement values
| Detection positions | Measuring point serial numbers | Actual measured value/HB | Average values/HB |
| Flange surfaces | 1 | 121 | 121 |
| 2 | 122 | ||
| 3 | 121 | ||
| 4 | 120 | ||
| 5 | 121 |
Previous: Hardening Process of Metal-seated Ball Valves
Next: Analysis of the Causes of Cracking of Main Steam Pipe Globe Valves


